Development Environment Setup
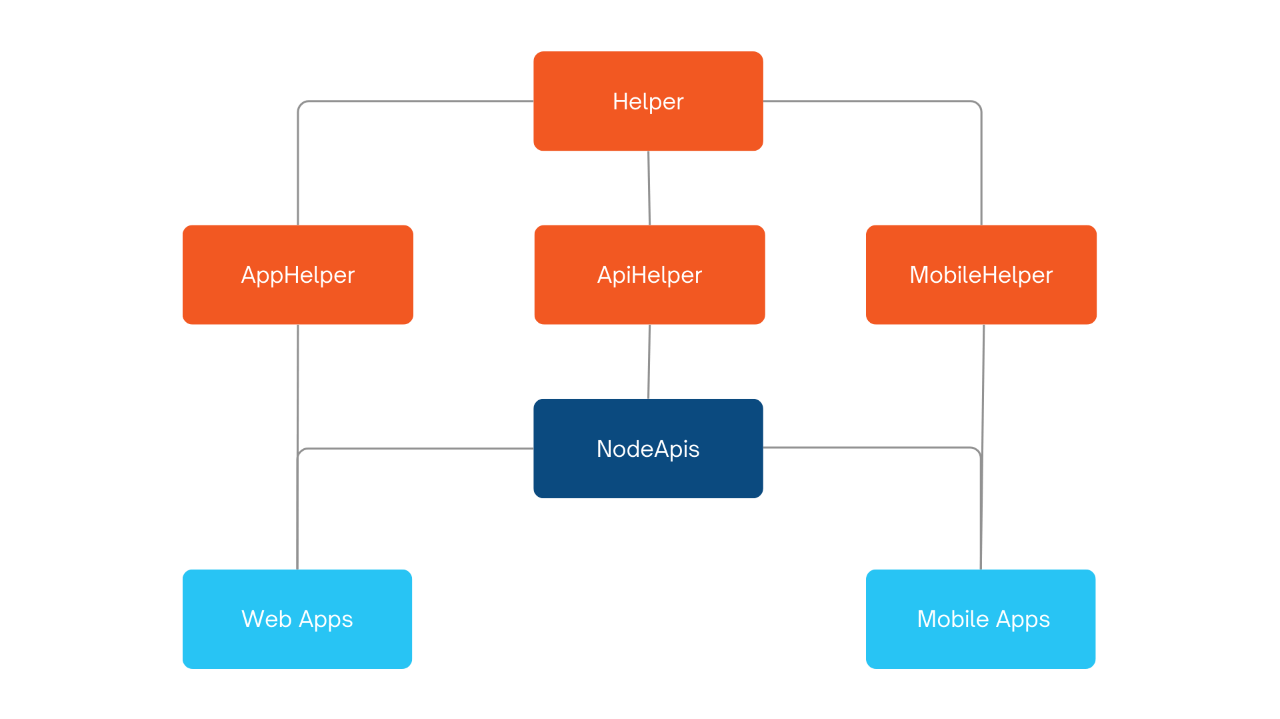
All of the projects fall into 5 categories:
Each of which use a Javscript (Typescript) based language. The NPM packages are Javascript, APIs are Node, web projects are React or Next.js, and mobile projects are React Native.
You can either set these projects up individually using the instructions below or jump to the Docker instructions to create a local environment.

API Project Setup
There are a number of Core APIs that each project uses some combination of. Each of these APIs is tied to a fully independent MySQL database with the same name. These are:
- MembershipApi - Contains information about people and groups.
- AttendanceApi - Contains information about campuses, services, service times, and attendance.
- DoingApi - Enables assigning tasks and defining automated processes.
- ContentApi - Contains mostly markdown information for websites and mobile content, and events.
- GivingApi - Contains donation settings and history.
- MessaingApi - Enables notes, private messages, and real-time chat.
- ReportingApi - Contains reports that span across multiple databases.
In addition to these shared APIs, the lessons.church app has it's own LessonsApi that contains the content of the lessons.
The setup process is the same for all the APIs.
- Clone the appropriate repo from GitHub.
- Create a new MySQL database with a name matching the project (
access,membership, etc). - Copy
dotenv.sample.txtto.envand edit it to point to your MySQL database. - Install the dependencies with:
npm install - Create the database tables with
npm run initdb - Start the api with
npm run dev
API | Port |
|---|---|
[ContentApi](https://github.com/LiveChurchSolutions/ContentApi/) | 8082 |
[MembershipApi](https://github.com/LiveChurchSolutions/MembershipApi/) | 8083 |
[GivingApi](https://github.com/LiveChurchSolutions/GivingApi/) | 8084 |
[AttendanceApi](https://github.com/LiveChurchSolutions/AttendanceApi/) | 8085 |
[MessagingApi](https://github.com/LiveChurchSolutions/MessagingApi/) (REST) | 8086 |
[MessagingApi](https://github.com/LiveChurchSolutions/MessagingApi/) (Socket) | 8087 |
[DoingApi](https://github.com/LiveChurchSolutions/DoingApi/) | 8088 |
[ReportingApi](https://github.com/LiveChurchSolutions/ReportingApi/) | 8089 |
[LessonsApi](https://github.com/LiveChurchSolutions/LessonsApi/) | 8090 |
NPM Project Setup
We have four projects that contain reusable code that is shared across the other projects. These are:
- @churchapps/helpers - Code that is useful across platform. Examples include working with arrays, currency, dates, error handling, users, and donations.
- @churchapps/apihelper - Node.js helper functions. Includes error logging, authentication, a base class for controllers, MySql, email, and encryption.
- @churchapps/apphelper - React and Next.js helper functions. Includes code for calling APIs, analytics, file upload, url slugs, and web sockets.
- @churchapps/mobilehelper - ReactNative helper functions. Includes code for calling APIs, App Center, mobile styling and dimensions and validation.
Building these projects is as simple as running. npm i and npm build
Testing
The easiest way to test is with npm link:
- After making changes run
npm run buildfollowed bynpm linkto expose the package locally. - In your test project run
@npm link @churchapps/mobilehelperor the name of the package you wish to test. - Rerun both after changes.
Note: On occassion NPM link just fails to work. The workaround for now is a batch file to manually compile the changes and place them in the node_modules folder
cd AppHelper
call npm run build
cd dist
xcopy * d:\sourcecode\lcs\b1\b1app\node_modules@churchapps\apphelper\dist\ /s /e /y
cd ..
cd src
xcopy * d:\sourcecode\lcs\b1\b1app\node_modules@churchapps\apphelper\src\ /s /e /y
cd ..
cd ..
rmdir d:\sourcecode\lcs\b1\b1app.next\cache /s /q
echo "Done"
Deployment
You must have permission on npmjs to deploy. If you do, the steps are:
- Update the version number in package.json
- Run
npm run build - Run
<code>npm publish --access=public</code>
Web Project Setup
All of the web projects are coded in either React or Next.js with Typescript and also have a similar setup process. Each of the Web projects depend on some combination of the APIs above. You can follow the setup instructions above to set those up, or simply point to the staging servers which are listed in the dotenv.sample.txt files.
To setup a web project:
- Copy
dotenv.sample.txtto.envand updated it to point to the appropriate API urls. - Install the dependencies with:
npm install - run
npm startfor React ornpm run devfor Next.js to launch the project.
Mobile Project Setup
All of the mobile device projects are built in React Native. This allows us to have a single codebase for iOS and Android. At this time B1 is available on both platforms while LessonsScreen and ChumsCheckin are available for Android only, but offered in both the Google Play and Amazon Fire stores.
- Set up the corresponding website and APIs first.
- Clone the appropriate repo from GitHub.
- Install the dependencies with:
npm install - Run
npm startto start the React Native server - Open the /android folder in Android Studio and run on an emulator or device.
- Run
adb shell input keyevent 82to open the developer menu. Go to settings, Debug server host and enter YourIP:8081. Restart the app and it should connect to the react server and work properly.
Docker Setup
See setup video.
Docker isn't required for any of the projects, but it does make setting up the Core APIs (Access, Attendance, Giving, Membership, and Reporting) that are needed by most projects much easier. Without Docker, you need to setup each of these projects manually then every time you wish to run them you must launch for command prompts running each of these APIs in addition to any other projects you need to run. Docker will do all this automatically in the background. It is possible to run all of the projects, including web, fully within Docker. However, it consumes a lot of RAM. It's recommended to just launch the Core Apis with it. To do so:
- Download and install Docker Desktop
- Clone the Docker Repo.
- From a command prompt browse to the
/Containers/Dev/CoreApisfolder. - Run
docker-compose up -dto create the environment. This will take about 5-10 minutes the first time..
Connecting VSCode
- Install the "Docker" and "Remote Containers" extensions for VSCode.
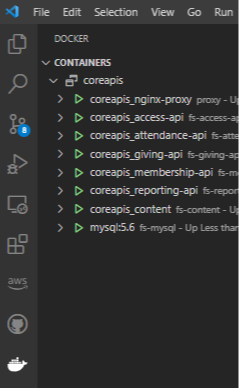
- You will have a new Docker tab on the left of VSCode, expand it.
- Expand the container you are using to see a list of apps. Right click the desired app and select "Attach Visual Studio Code". This will launch a new instance of VSCode tied to that app.
- In the files section of the new VSCode instance, select "Open Folder" and enter "/app/"
- To view console output, in the original VSCode instance, right click on the app and select "View Logs"
- To connect the debugger, click on the Run and Debug icond on the left of VSCode running the image, and choose the "Docker: Attach to Node" option.

Additional Commands
- Build and start the Docker container for the first time:
docker-compose up -d - Stop the Docker container:
docker-compose stop - Restart the docker container:
docker-compose start - Reset everything except MySql:
docker-compose downfollowed bydocker-compose build --no-cacheanddocker-compose up -d - Reset everything including MySql:
docker-compose down -vfollowed bydocker-compose build --no-cacheanddocker-compose up -d - Completely reinstall everything:
docker-compose down --rmi localfollowed bydocker-compose build --no-cacheanddocker-compose up -d
Creating an Account
See setup video.
On production when you create a user account it generates a temporary password and emails it to you. Since you will not have a mail server set up on your dev machine, you have to do a little more work to get this temporary password:
- Get the api and web project(s) running.
- Open the Docker drawer in VS Code and right click on MembershipApi.
- Choose 'View Logs'.
- Register an account in the web app you're working with.
- The welcome email with your temporary password will be displayed in the log.
- Login with the temp password and it'll prompt you to search for a church.
- There are no churches in your local database yet so create a new one.
If you wish to change your temporary password, launch the Chums project, log in and manage your account.
Desktop Project Setup
We currently have one desktop application of FreeShow. It is also written in a Typescript using Electron, which provides the cross-platform capabilities. It utilizes Svelte for the UI. Unlike the mobile and web projects, this one is stand-alone and does not depend on any of the APIs above. Setup is very easy:
- Clone the the repo from GitHub.
- Install the dependencies with:
npm install - Run
npm startto start Electron server
